* Update ch06-certificates.md

Some Chinese characters in the English document

* Update ch06-certificates.md

some Chinese characters in the English document

* Update ch06-certificates.md

1 extra letter…

* Update ch07-xray-server.md

* what did i do

holy
26 KiB
[Chapter 7]Xray Server
7.1 Study broadly, Act decisively.
During the writing of this article, the boss joked: Your tutorial has been serialized for 6 chapters and has not yet reached Xray. People who don’t know would think that you are a "hand-in-hand teaching you to build a website" tutorial. (I can't refute it.jpg!)
In fact, this structure is my decision after much thinking. After all, only by laying a solid foundation can you quickly surpass others with half the effort. I saw many newcomers in the group who can't even use nano correctly, nor can they use WinSCP. The config.json edited by remote handwriting is naturally full of errors, and even error checking becomes difficult.
::: warning After the preparation of the first 6 chapters, you have already climbed over several mountains with me, such as basic Linux operations, VPS remote management, web page construction, domain name management, certificate application, etc. Do you think it is actually very simple when you look back? Now that we have such solid preparations, we will have a light feeling of [smooth success] when installing and configuring Xray. :::
The things to do next are very simple:
- Installation
- Configuration (such as installing TLS certificates,
config.json) - Run
- Optimization (such as updating the kernel, enabling
bbr, automatically redirectinghttpvisits tohttps, etc.)
7.2 Install Xray
First of all, the official carrier of Xray is the binary program generated by the open source project xray-core (Open sourced with License MPL 2.0
). If you put this binary on the server and run it, it is the server side; if you download it to the local computer and run it, it is the client side. The main difference comes from [configuration].
When installing, it is very simple and direct to use the official installation script directly. It provides a variety of installation options. If you are interested, you can go to the official installation script repository to see the script instructions. This article uses the [non-root user] installation mode.
When writing this article, the installation script had some minor bugs when using a non-root account, so I decided to separate these steps and explain the deletion command under Linux.
-
Basic Linux commands for beginners:
Number Command name Command description cmd-14rmdelete -
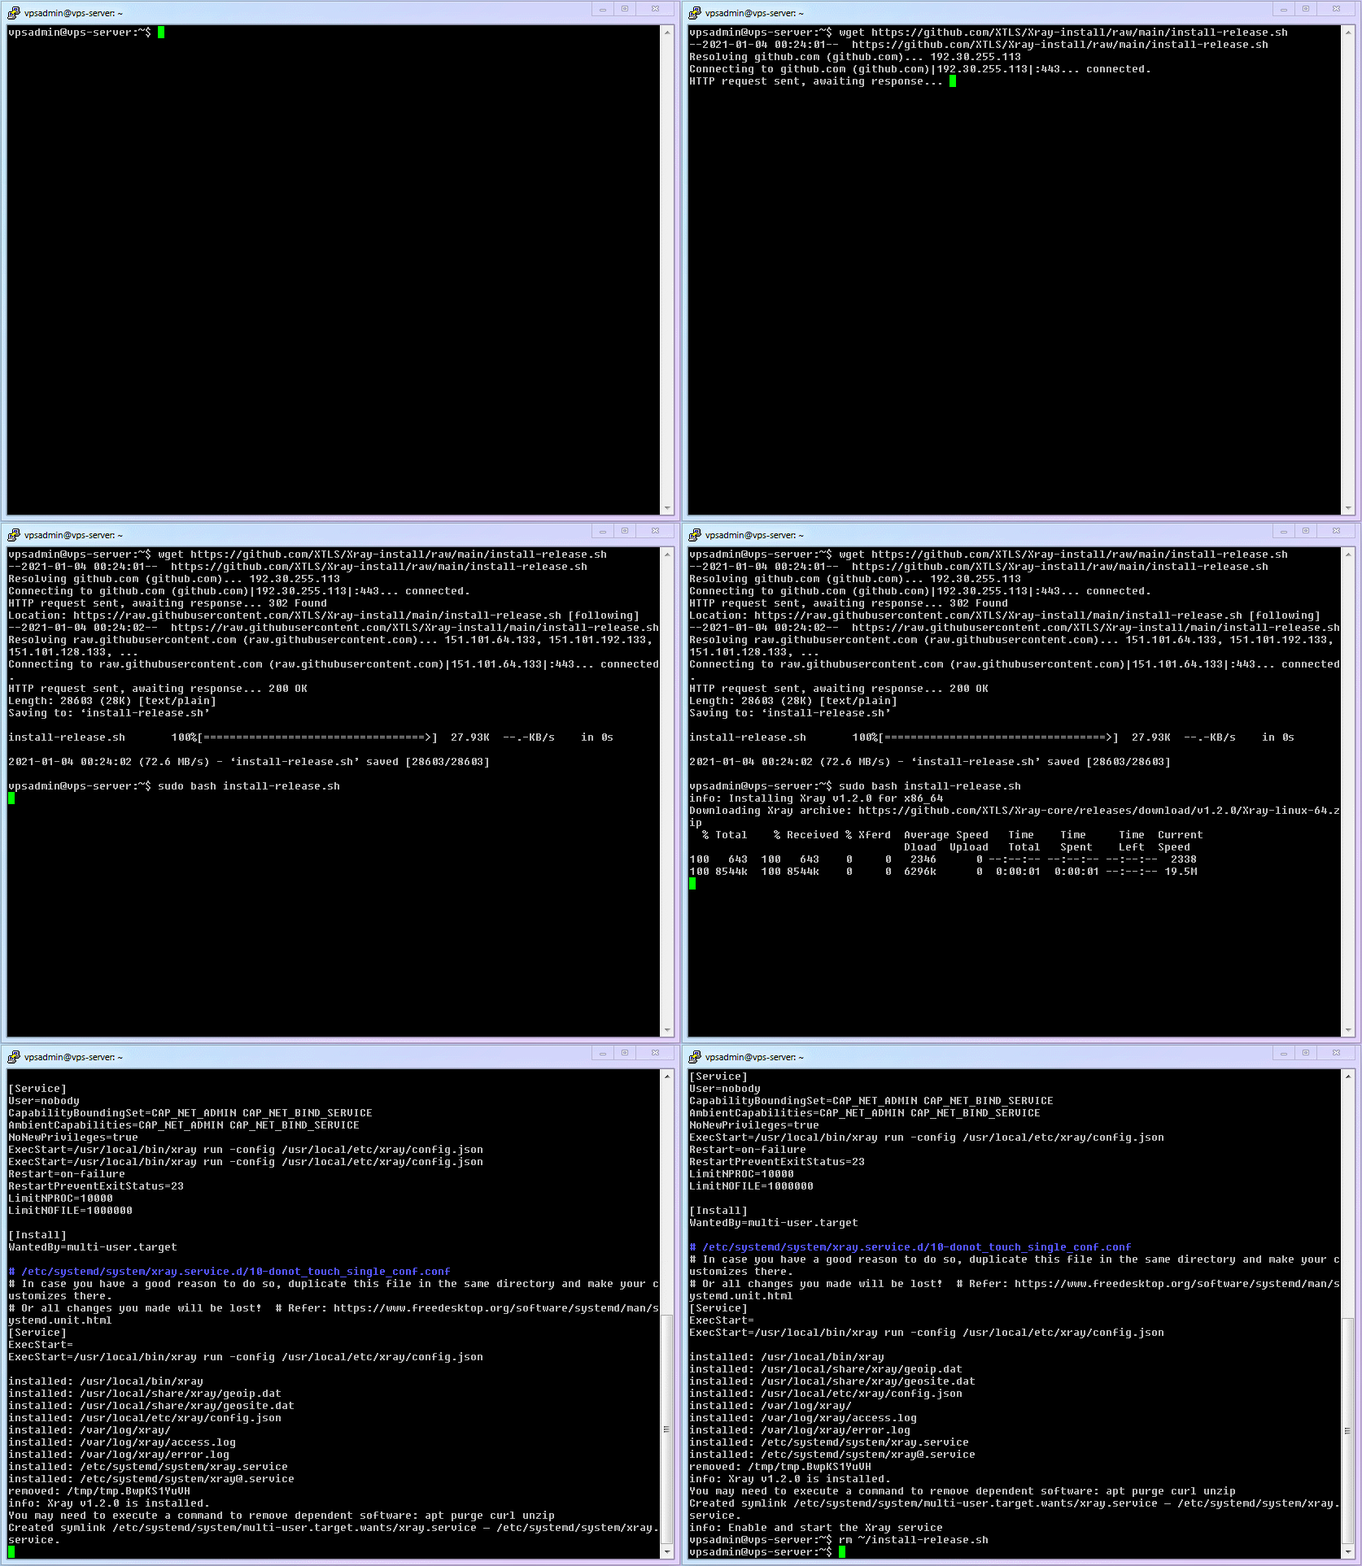
Download the installation script:
wget https://github.com/XTLS/Xray-install/raw/main/install-release.sh
- Execute the installation command
sudo bash install-release.sh
- You can delete the script after use
rm ~/install-release.sh
::: warning
When you use the rm command to delete files, the default is to delete the files in the current folder. However, I still wrote the full path: ~/install-release.sh, which is a safety habit I have when using rm, and it is also what I want to emphasize after I divide the installation into several steps. If you have heard some jokes like "Programmers go from deleting libraries to running away", you probably know why.
:::
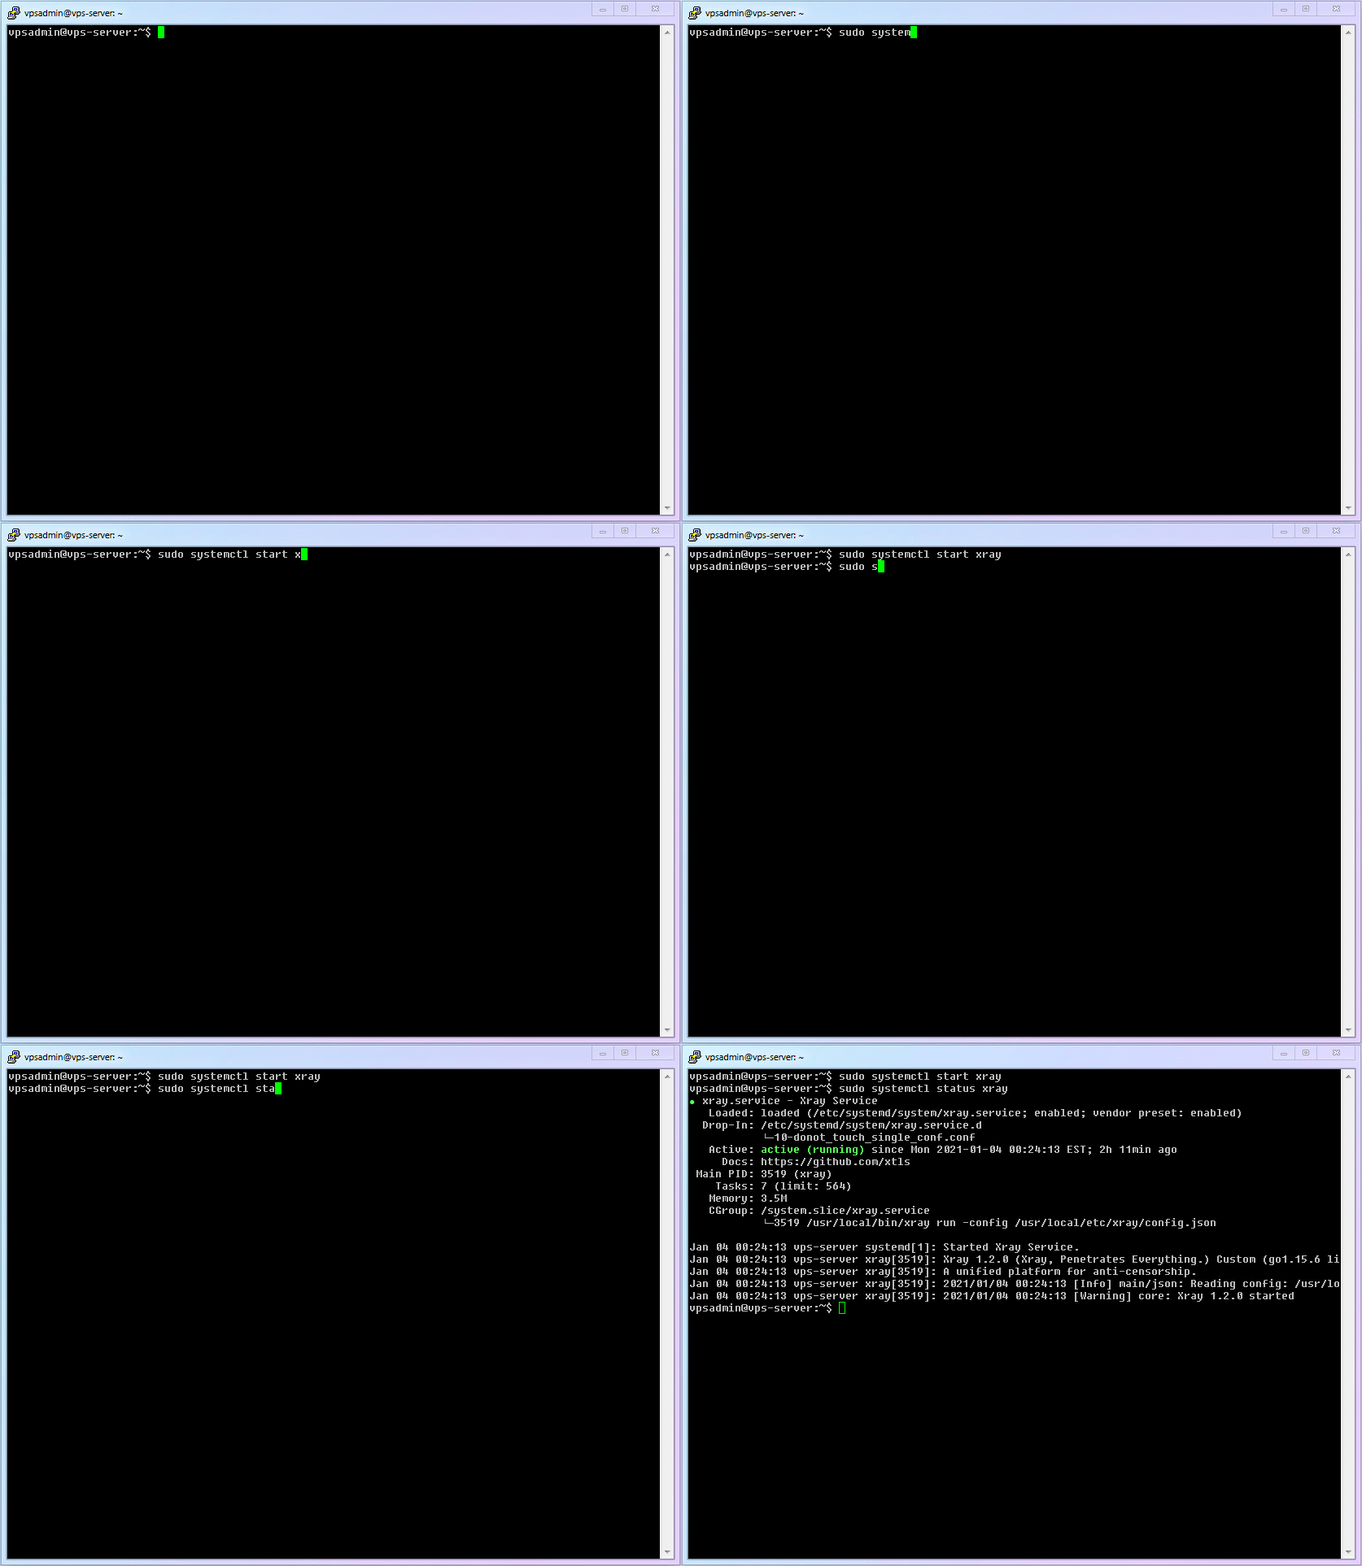
- The complete process is demonstrated as follows:
7.3 Configure TLS certificate for Xray
Although we have applied for TLS
certificate before, according to the official instructions of acme.sh, it is not recommended to use the applied certificate directly. The correct way is to use the --install-cert
command to install it for the required program. Let's install the certificate for xray-core now.
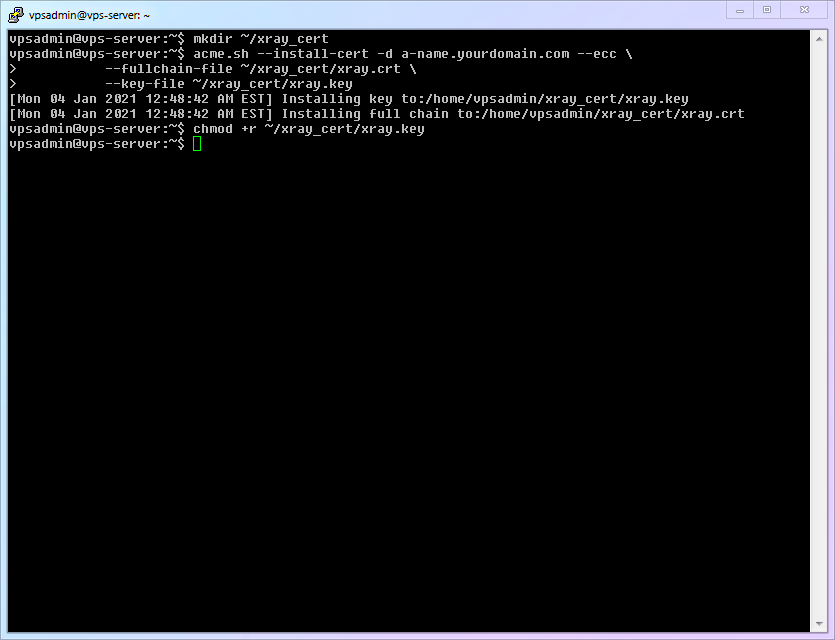
- In order to avoid various potential permission problems of non-root accounts, we create a certificate folder under the vpsadmin account
mkdir ~/xray_cert
- Use
--install-certofacme.shto correctly install (copy) the certificate file
acme.sh --install-cert -d secondary domain name.your domain name.com --ecc \
--fullchain-file ~/xray_cert/xray.crt \
--key-file ~/xray_cert/xray.key
- The
xray.keyfile is not readable by other users by default, so it needs to be given readability
chmod +r ~/xray_cert/xray.key
- The process is relatively simple, so no animated picture:
-
acme.shwill check the certificate every 60 days and automatically renew the expiring certificate. But as far as I know, it does not automatically install the new certificate toxray-core, so we need to add a system automatic periodic task to complete this step.-
Basic Linux commands for beginners:
Number Command name Command description cmd-15crontab -eEdit the current user's scheduled task -
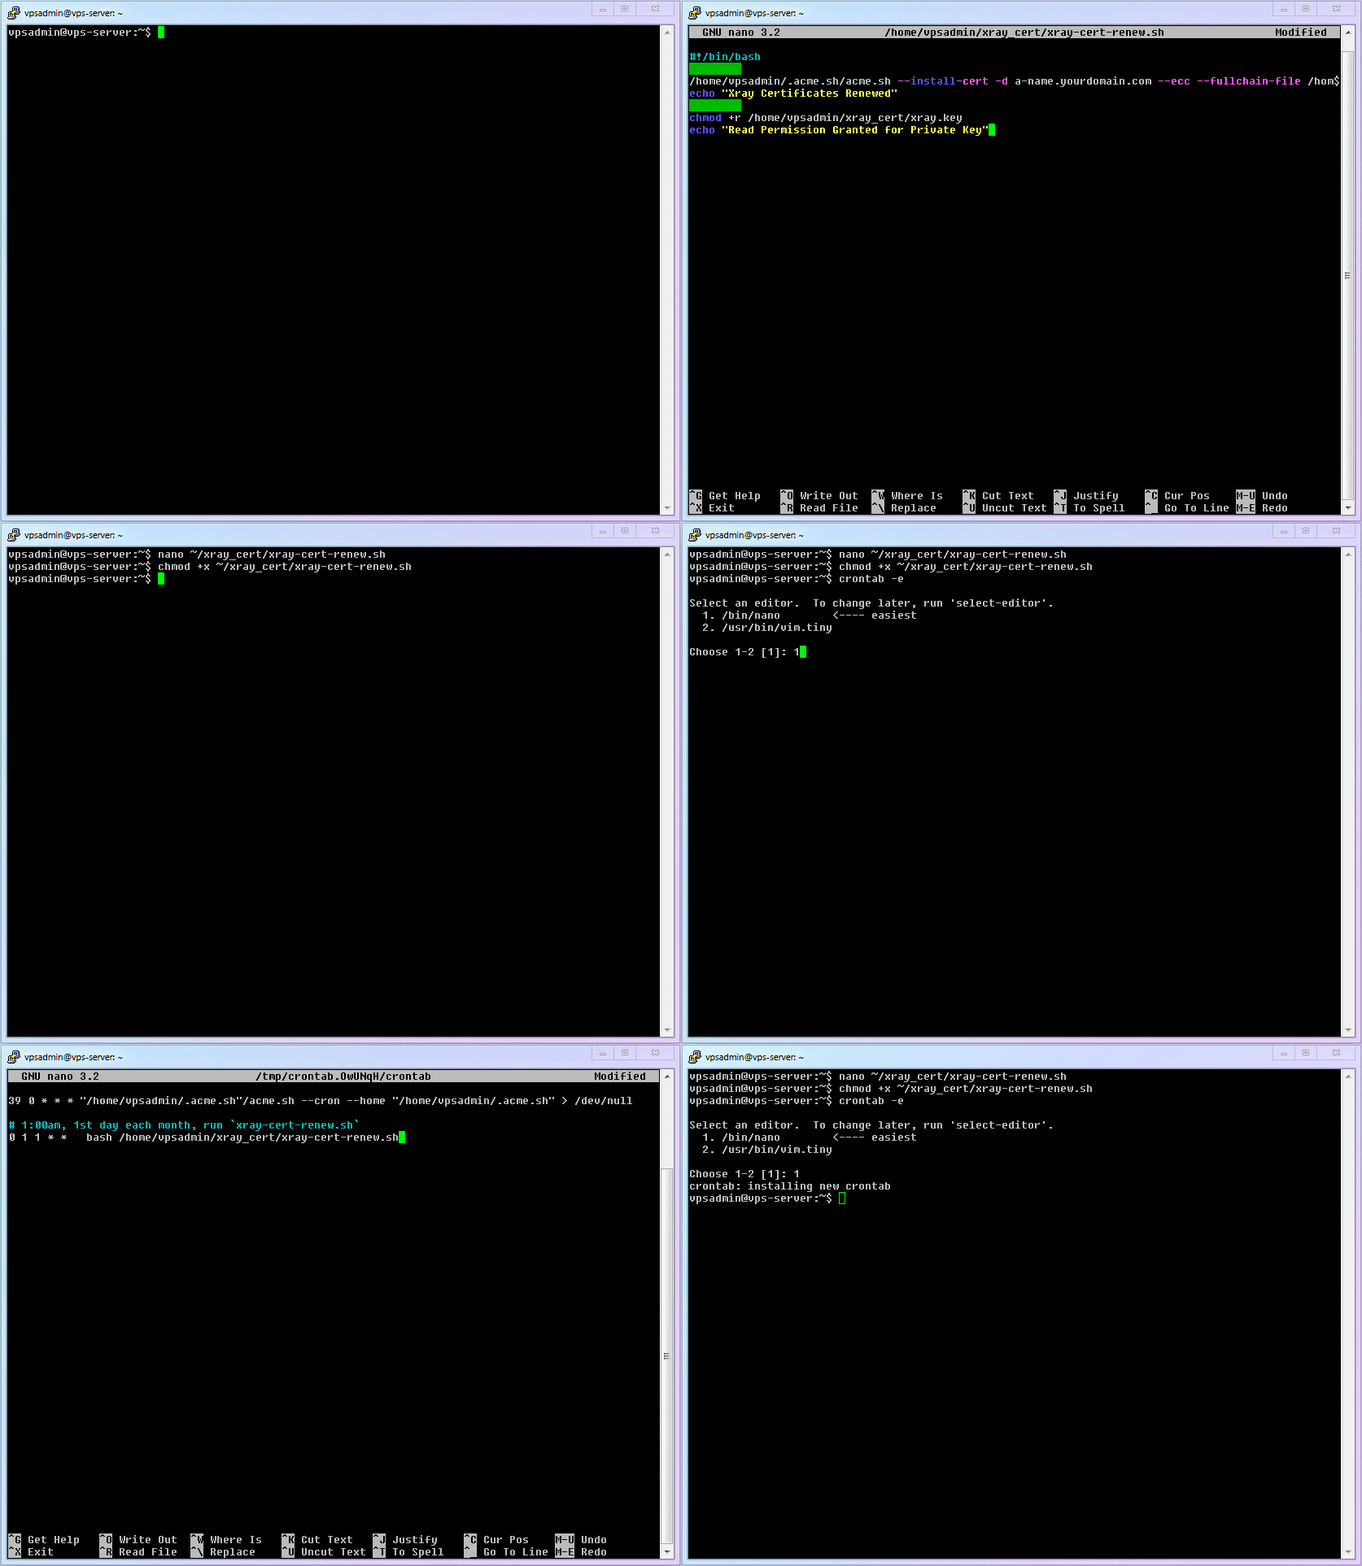
Create a script file (
xray-cert-renew.sh)nano ~/xray_cert/xray-cert-renew.sh -
Copy the following content, remember to replace your real domain name, then save and exit
#!/bin/bash

/home/vpsadmin/.acme.sh/acme.sh --install-cert -d a-name.yourdomain.com --ecc --fullchain-file /home/vpsadmin/xray_cert/xray.crt --key-file /home/vpsadmin/xray_cert/xray.key
echo "Xray Certificates Renewed"

chmod +r /home/vpsadmin/xray_cert/xray.key
echo "Read Permission Granted for Private Key"

sudo systemctl restart xray
echo "Xray Restarted"
::: warning As you have reminded,
acme.shhas areloadcmdcommand that can automatically execute a specific command when the certificate is updated, so you can specify to automatically install the certificate forXray, but becausecrontabis a very useful and commonly used function in Linux, this article retains thecrontabmethod to update theXraycertificate. (If you interested inreloadcmdcan check out the official documentation ofacme.sh)In addition, when recording animated images, the script did not include a command to restart
XraybecauseXrayplans to support the [Certificate Hot Update] function, which means thatXraywill automatically identify certificate updates and reload certificates without manual restart. After the function is added, I will modifyconfig.jsonappropriately to enable this setting and delete the restart command in the script. :::-
Add [executable] permissions to this file
chmod +x ~/xray_cert/xray-cert-renew.sh -
Run
crontab -eand add an automatic task [Automatically runxray-cert-renew.shonce a month] (Note that you should not addsudo, because we are adding an automatic task for thevpsadminaccount. When you run it for the first time, you will be asked to choose an editor. Of course, choose the familiarnano!)crontab -e -
Add the following content to the end of the file, save and exit.
# 1:00am, 1st day each month, run `xray-cert-renew.sh` 0 1 1 * * bash /home/vpsadmin/xray_cert/xray-cert-renew.sh -
The complete process is demonstrated as follows:
-
7.4 Configure Xray
First, you can refer to the official VLESS configuration example for various configurations. This article will configure a simplest method based on the official example: [Single VLESS protocol inbound + 80 Port fallback], which meets the maximum speed and necessary security of most scenarios.
-
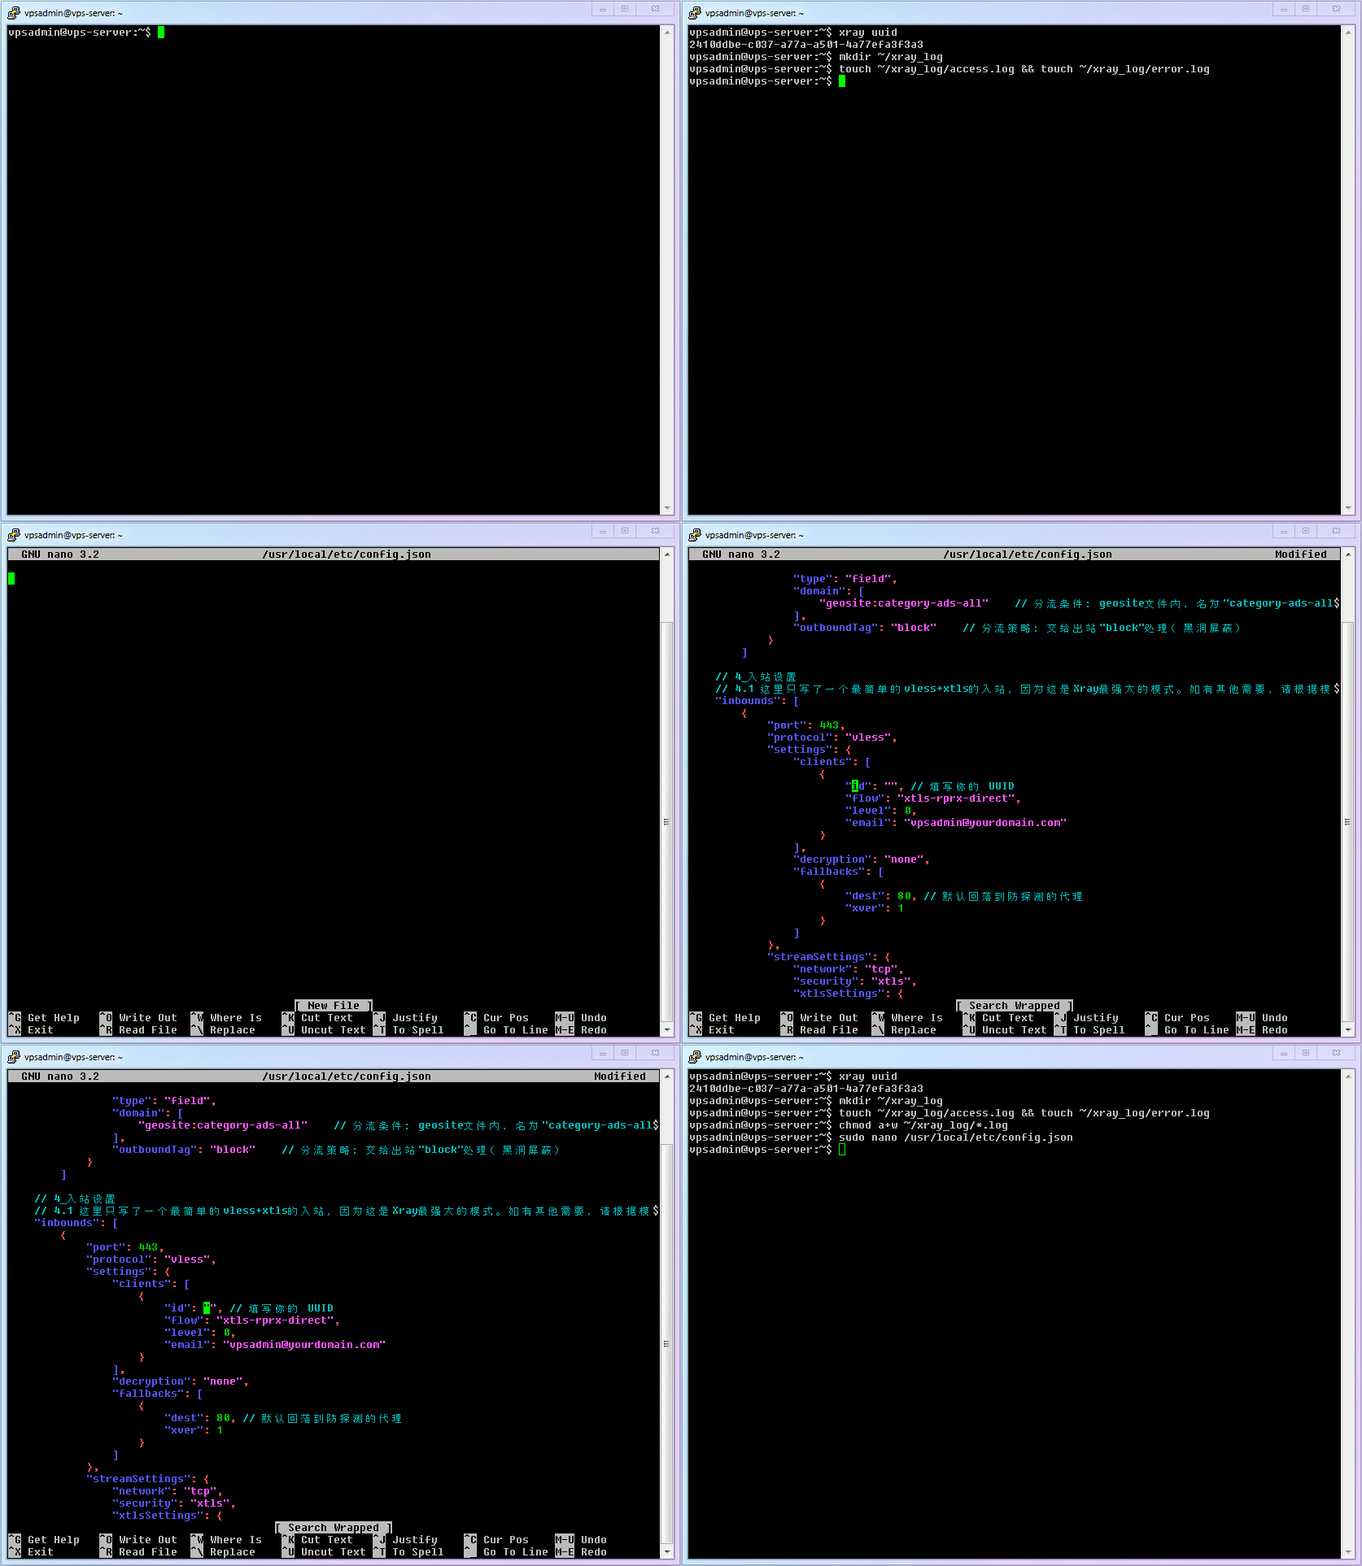
Generate a legal
UUIDand save it for backup (UUIDcan be simply and roughly understood as an ID that is almost never repeated like a fingerprint)xray uuid -
Create log files and folders for backup
-
Basic Linux commands for beginners:
Number Command name Command description cmd-16touchCreate a blank file -
Create a [log dedicated folder] in the
vpsadminfoldermkdir ~/xray_log -
Generate the two required log files (access log, error log)
touch ~/xray_log/access.log && touch ~/xray_log/error.log
::: warning This location is not the standard log file location of
Xray. It is placed here to avoid permission issues that cause trouble for new users. Once you are familiar with it, it is recommended to return to the default location:/var/log/xray/access.logand/var/log/xray/error.log. :::- Because Xray is used by the nobody user by default, we need to allow other users to have "write" permissions (
*.logmeans all files with the suffixlog, and the efficiency advantage of theCLIinterface gradually appears at this time)chmod a+w ~/xray_log/*.log
-
-
Use
nanoto create the configuration file ofXraysudo nano /usr/local/etc/xray/config.json -
Copy all the files below and fill in the previously generated
UUIDinto the 61st line"id": "",. (After filling in, it will look like"id": "uuiduuid-uuid-uuid-uuid-uuiduuiduuid") This configuration file in this article adds my various verbose comments to help you understand the function of each configuration module.
// REFERENCE:
// https://github.com/XTLS/Xray-examples
// https://xtls.github.io/config/
// Commonly used config files, whether server or client, have 5 parts. Plus Xiao Xiaobai's interpretation:
// ┌─ 1*log Log settings - what to write in the log and where to write (there is evidence when errors occur)
// ├─ 2_dns DNS-settings - how to check DNS (anti-DNS pollution, anti-peeping, avoid matching domestic and foreign sites to foreign servers, etc.)
// ├─ 3_routing Diversion settings - how to classify and process traffic (whether to filter ads, whether to divert traffic domestically and internationally)
// ├─ 4_inbounds Inbound settings - what traffic can flow into Xray
// └─ 5_outbounds Outbound settings - where does the traffic out of Xray go
{
	// 1\_Log settings
	"log": {
		"loglevel": "warning", // content from less to more: "none", "error", "warning", "info", "debug"
		"access": "/home/vpsadmin/xray_log/access.log", // access record
		"error": "/home/vpsadmin/xray_log/error.log" // Error log
	},
	// 2_DNS settings
	"dns": {
		"servers": [
			"https+local://1.1.1.1/dns-query", // Prefer 1.1.1.1 DoH query, sacrificing speed but preventing ISP snooping
			"localhost"
		]
	},
	// 3*Diversion settings
	"routing": {
		"domainStrategy": "IPIfNonMatch",
		"rules": [
			// 3.1 Prevent local server flow problems: such as intranet attacks or abuse, incorrect local loopbacks, etc.
			{
				"type": "field",
				"ip": [
					"geoip:private" // Diversion condition: In the geoip file, the rule named "private" (local)
				],
				"outboundTag": "block" // Diversion strategy: Hand over to the outbound "block" for processing (black hole shielding)
			},
			{
				// 3.2 Prevent the server from connecting directly to China
				"type": "field",
				"ip": ["geoip:cn"],
				"outboundTag": "block"
			},
			// 3.3 Block ads
			{
				"type": "field",
				"domain": [
					"geosite:category-ads-all" // Diversion conditions: In the geosite file, the rule named "category-ads-all" (various advertising domain names)
				],
				"outboundTag": "block" // Diversion strategy: Hand it over to the outbound "block" for processing (black hole shielding)
			}
		]
	},
	// 4* Inbound settings
	// 4.1 Here is only the simplest vless+xtls inbound, because this is the most powerful mode of Xray. If you need other, please add it according to the template.
	"inbounds": [{
		"port": 443,
		"protocol": "vless",
		"settings": {
			"clients": [{
				"id": "", // Fill in your UUID
				"flow": "xtls-rprx-vision",
				"level": 0,
				"email": "vpsadmin@yourdomain.com"
			}],
			"decryption": "none",
			"fallbacks": [{
				"dest": 80 // Fall back to anti-detection proxy by default
			}]
		},
		"streamSettings": {
			"network": "tcp",
			"security": "tls",
			"tlsSettings": {
				"alpn": "http/1.1",
				"certificates": [{
					"certificateFile": "/home/vpsadmin/xray_cert/xray.crt",
					"keyFile": "/home/vpsadmin/xray_cert/xray.key"
				}]
			}
		}
	}],
	// 5*Outbound settings
	"outbounds": [
		// 5.1 The first outbound is the default rule, freedom is a direct connection to the outside (vps is already an external network, so it is a direct connection)
		{
			"tag": "direct",
			"protocol": "freedom"
		},
		// 5.2 Blocking rules, blackhole protocol is to import traffic into the black hole (blocking)
		{
			"tag": "block",
			"protocol": "blackhole"
		}
	]
}
7.5 Start Xray service! ! (and check the service status)
If you follow this article step by step, you have actually avoided the two most common pitfalls of insufficient log file permissions and insufficient certificate file permissions. Now running Xray should be very smooth.
- Enter the following command and enjoy the historic moment of starting
Xray! ! !
sudo systemctl start xray
- Just
startdoes not determine whether the Xray service has been successfully started. To determine its status, use the following command.
sudo systemctl status xray
Do you see the green, pleasant active (running)? It means that Xray is running correctly
- The complete process is demonstrated as follows:
7.6 Review systemd for basic service management
So far, we have used systemctl related commands such as start, status, reload, etc. These are general commands based on the systemd management module to manage various services in the Linux
system. Now it is a good time to get familiar with several other related commands.
- If you need to temporarily shut down the
Xrayservice, use thestopcommand
sudo systemctl stop xray
- If you need to restart the
Xrayservice, use therestartcommand
sudo systemctl restart xray
- If you need to disable the
Xrayservice (disable Xray from running automatically after the computer is restarted), use thedisablecommand
sudo systemctl disable xray
- If you need to enable the
Xrayservice (ensure that Xray runs automatically after the computer is restarted), use theenablecommand
sudo systemctl enable xray
7.7 Server Optimization 1: Enable BBR
- The legendary
BBR
I believe that when you search for various scientific Internet technologies, you must have heard of the thing bbr more than once. With the exaggeration of various blogs, people feel that it is magical. There are also a lot of derivatives such as bbrplus, bbr2, magic bbr, etc. It's like a magic, which can turn a poorly routed lines become dedicated connections.
So, what is this thing? Is it useful? Which version should I use?
- The actual
BBR
- BBR = Bottleneck Bandwidth and Round-trip propagation time, which is a congestion control algorithm of TCP. A simple and rough understanding is traffic management of data traffic
- When the road is no longer congested, each car can naturally maintain a faster speed.
So is it useful? Generally speaking, there will be a perceptible difference between with BBR and without BBR (there will be some improvements in speed, stability, and latency), so [It is highly recommended to turn on BBR].
But after it is enabled, the difference between BBR in 4.x and 5.x is often subtle and subjective, and the decisive factor that causes the difference in experience is still the line quality. So [Don't worry about the version, don't blindly chase the new, just follow your distribution to update the kernel]
- Are
bbrplus,bbr2,magic bbrand other versions that sound cool better?
In a word: **No! Don't use these! These names are just to attract attention! **
The update and release of BBR are all carried out in accordance with the Linux kernel (Kernel). In other words, as long as you use a relatively new kernel, you will naturally use the new version of BBR.
And these things with cool names are, to put it bluntly, kernels that have not yet been officially released and are still in the testing stage and their corresponding BBR versions. These scripts are just the first to enable by downloading the preview version of the kernel (even a third-party magic kernel).
The stability of the kernel is the cornerstone of the stable operation of a server. The slight performance difference brought by the BBR beta is definitely not worth changing to an unstable Kernel. 】 Please choose the latest kernel supported by your Linux distribution, so as to maximize the long-term stability and compatibility of the server.
::: warning
The so-called "leading" of the magic modification bbr is very time-sensitive. For example, many bbrplus scripts, because they have not been updated for several years, will still change your kernel to 4.19. You should know that Debian is now stable and it is already the era of 5.9. Then this script may be a little ahead in January 2018, but it has lost its meaning when 4.19 is released in October 2018. It can even be said to be completely [downgraded] and [degraded] now.
- Which of
fq,fq_codel,fq_pie,cakeand other algorithms is better?
In one sentence: If you don't understand, please keep fq, which is enough and will not degrade your line
- Ruisu, Finalspeed, LotServer and other "acceleration tools"
In one sentence: **Don't use these! Throw them into the trash can of history! **
It can only solve the problem of packet loss rate. A not very accurate analogy is that you originally used a car to deliver your goods, and sometimes the car broke down halfway (packet loss). After using these, you directly sent out 3 copies of the same goods and let three cars deliver them at the same time. As long as one of them is not broken, it can be delivered. The road is full of your cars, so you can naturally squeeze others out. But it is conceivable that when you squeeze others, others will also squeeze you, and the exit road of the entire computer room is so wide, and it is bound to become a collective traffic jam in the end.
::: warning description Their principle is not algorithm optimization, not speed-up, most of them are simple and crude multiple packet delivery. It may be useful for bad lines with very high packet loss rates, but it has no optimization effect on good lines with low packet loss rates. Instead, it will consume your traffic exponentially, causing unnecessary pressure on the server and your neighbors.
If your line really has a very high packet loss rate, the only reliable solution is to change the line. :::
-
I have said so much because there are too many misconceptions and scam scripts around
BBRto fool novices. I hope you now have a relatively clear understanding ofBBR. Next, let's install the latest Debian kernel and enableBBR! (It's really simple)-
Add the official
backportssource to Debian 10 to get the updated software librarysudo nano /etc/apt/sources.list
::: warning description This article takes Debian 10 as an example, so there is still no problem using
/etc/apt/sources.list, but if you are not starting from scratch according to this article, or using other Linux distributions, it is recommended that you create a/etc/apt/sources.list.d/folder and create your own configuration file in this folder, such as/etc/apt/sources.list.d/vpsadmin.list, to ensure compatibility and avoid the default file being overwritten in unforeseen circumstances and causing configuration loss. :::-
Then add the following item at the end, save and exit.
deb http://deb.debian.org/debian buster-backports main -
Refresh the software library and query the latest version of the official Debian kernel and install it. Please be sure to install the version corresponding to your VPS (this article takes the more common [amd64] as an example).
sudo apt update && sudo apt -t buster-backports install linux-image-amd64
::: warning Note
If your VPS supports it, you can try the [cloud server dedicated kernel]
linux-image-cloud-amd64. The advantages are simplicity and low resource usage. The disadvantage is that some students have reported that forced installation on an unsupported system will cause the system to fail to boot (the kernel cannot be recognized).To avoid the tragedy of being unable to identify, please make sure:
- Take a system snapshot before trying, or
- You have
vncto save the day (and you know how to use it)
:::
-
Modify the
kernelparameter configuration filesysctl.confand specify to enableBBRsudo nano /etc/sysctl.conf
::: warning description This article takes Debian 10 as an example, so it is still no problem to use
/etc/sysctl.conf, but if you are not following this article from scratch, or use other Linux distributions, it is recommended that you create a/etc/sysctl.d/folder and create your own configuration file in this folder, such as/etc/sysctl.d/vpsadmin.conf, to ensure compatibility, because some distributions no longer read parameters from/etc/sysctl.confaftersystemd207 version. Using a custom configuration file can also prevent the default file from being overwritten in unexpected circumstances, resulting in configuration loss. :::-
Add the following content
net.core.default_qdisc=fq net.ipv4.tcp_congestion_control=bbr -
Restart the VPS to make the kernel update and
BBRsettings take effectsudo reboot -
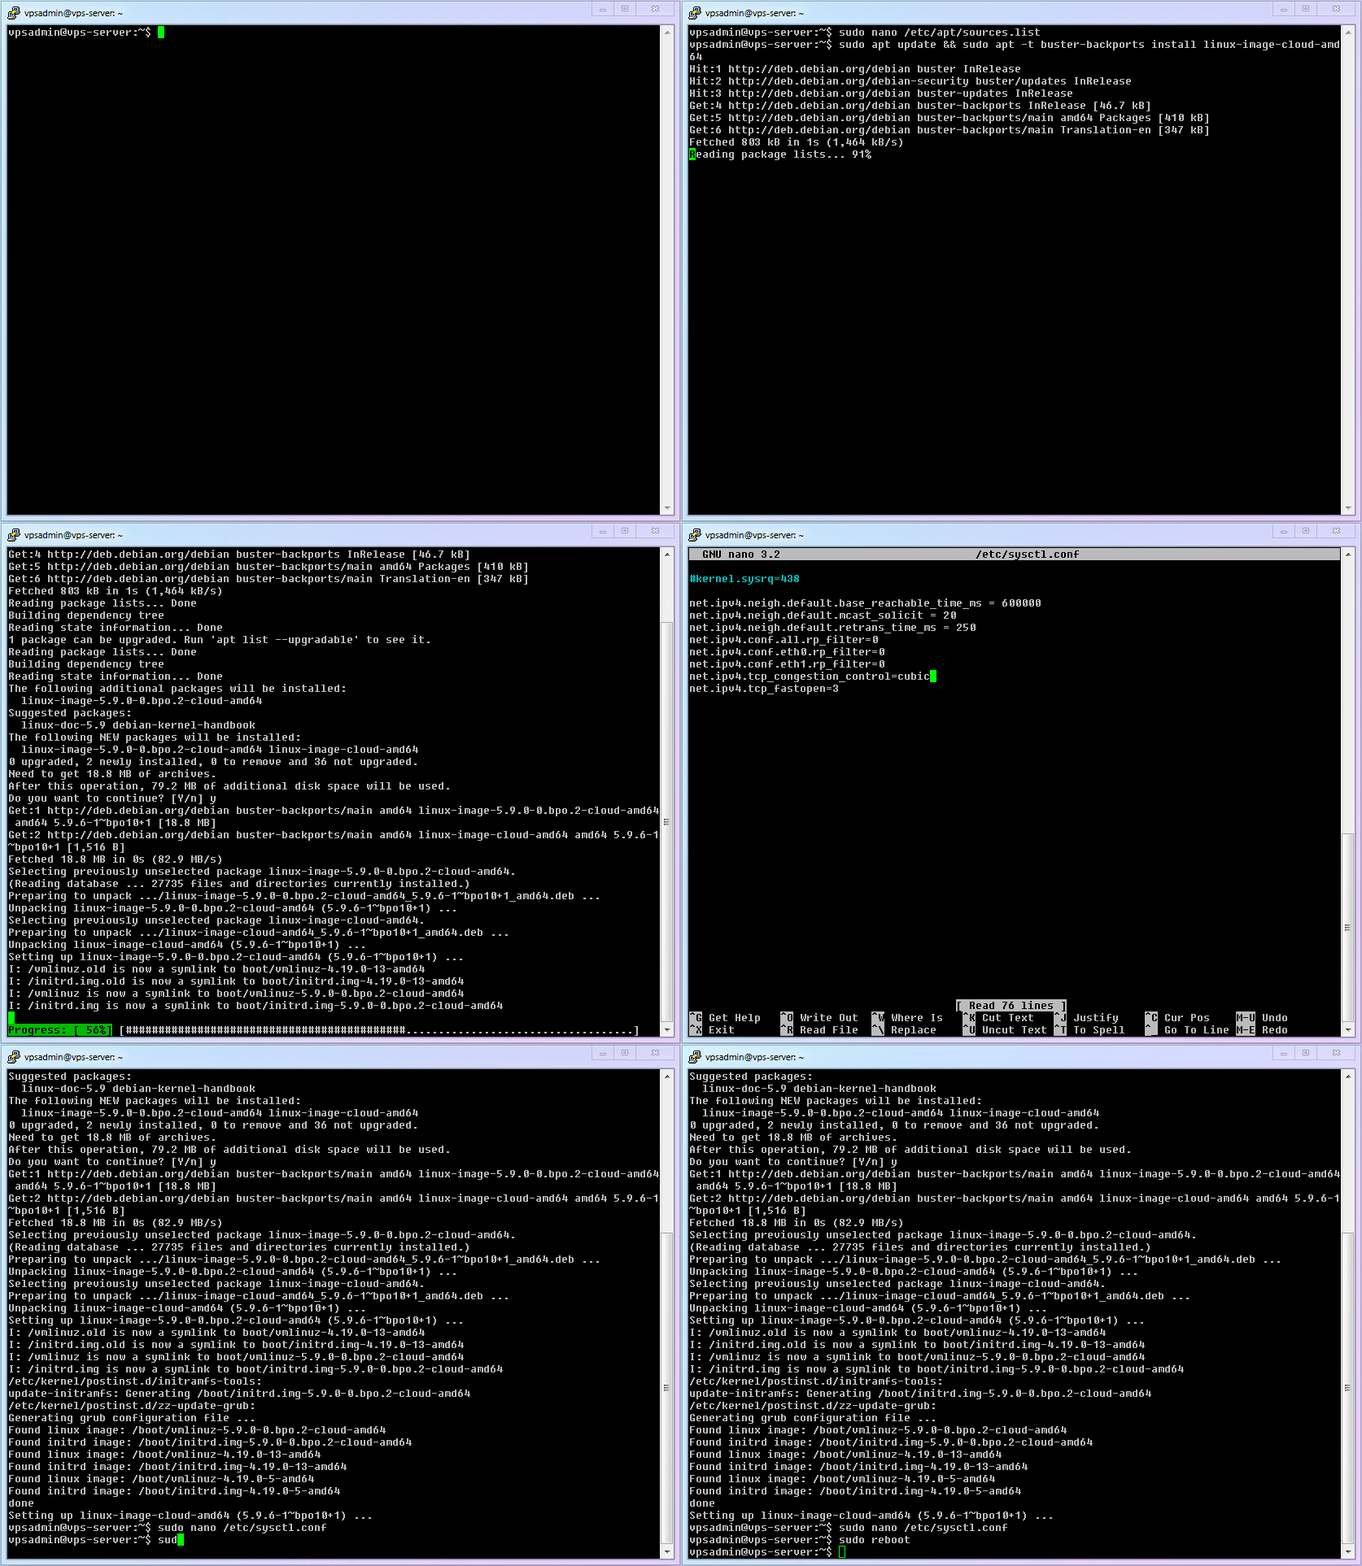
The complete process is demonstrated as follows:
::: tip Because the VPS I am demonstrating supports the cloud server-specific kernel, I used
linux-image-cloud-amd64in the animation.If you are not sure whether your VPS supports it, please follow the command in step 3 and use the regular kernel
linux-image-amd64. :::- Confirm that
BBRis enabled
-
If you want to confirm whether BBR is enabled correctly, you can use the following command:
shell lsmod | grep bbr
This should return the following result:
tcp_bbr
If you want to confirm whether the fq algorithm is enabled correctly, you can use the following command:
shell lsmod | grep fq
This should return the following result:
sch_fq
7.8 Server Optimization 2: Enable HTTP to automatically redirect to HTTPS
- We have previously built an
httpwebpage on port80and applied for a TLS certificate.
But if you try to access our interface with a browser, you will find that http access will not automatically upgrade to https access like most websites. In other words, under our current settings, http(80) and https(443) are completely independent. If you want to solve this problem, you need to make some changes.
- Edit the Nginx configuration file
sudo nano /etc/nginx/nginx.conf
- Add the following statement to the 80 port server we set, save and exit (you can delete the
rootandindexlines at the same time)
return 301 https://$http_host$request_uri;
- Add a local port listener at the same level as the
80port to provide web page display. This article uses the8080port for demonstration. (Can be any port)
server {
listen 127.0.0.1:8080;
root /home/vpsadmin/www/webpage;
index index.html;
add_header Strict-Transport-Security "max-age=63072000" always;
}
- Restart Nginx service
sudo systemctl restart nginx
- Modify the fallback settings of Xray, changing the fallback from
80port to8080port. (Find"dest": 80, and change it to"dest": 8080)
sudo nano /usr/local/etc/xray/config.json
- Restart the
Xrayservice to complete the configuration
sudo systemctl restart xray
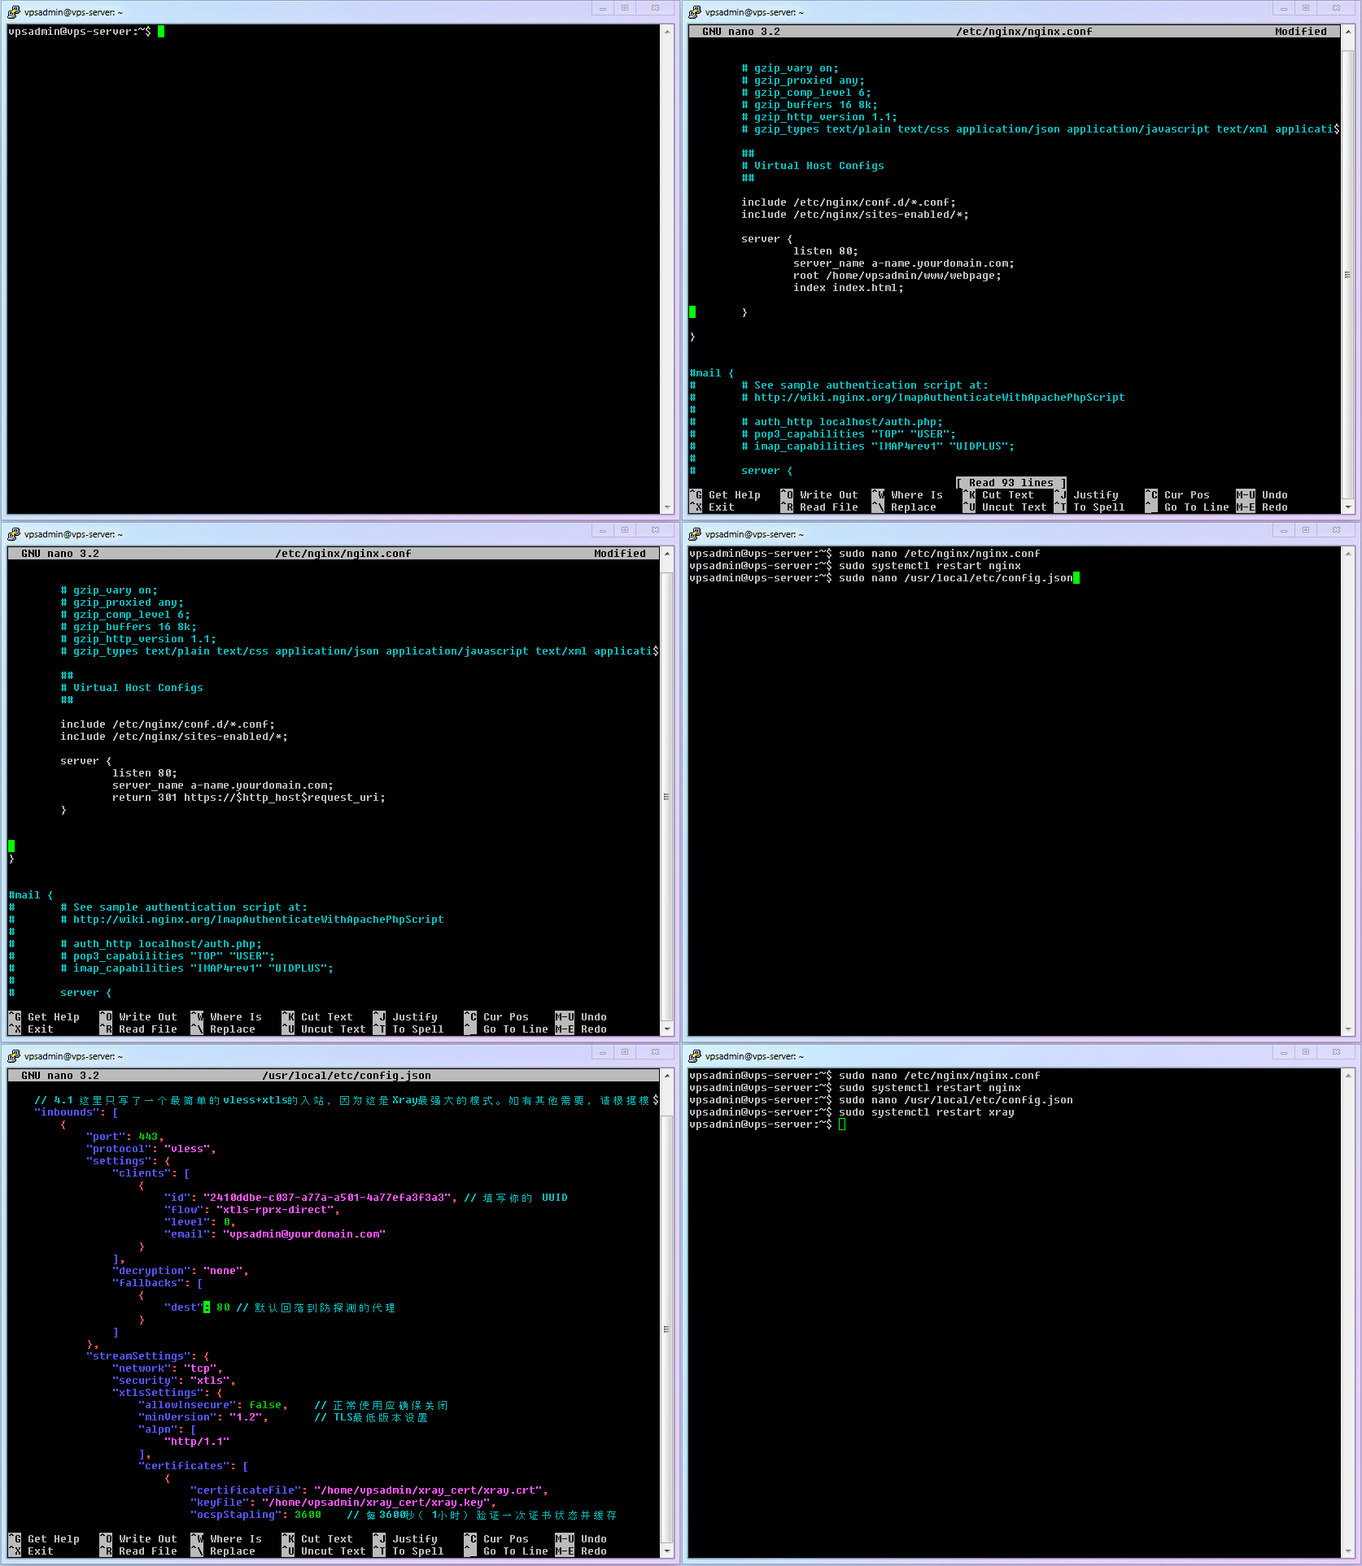
- The complete process is demonstrated as follows:
- When you enter
http://a-name.yourdomain.com, it should automatically jump to https
7.9 Server Optimization 3: More Fallbacks
If you need more fallback functions, please refer to 《Fallbacks (fallbacks) Functional Analysis》
7.10 Your progress
Congratulations!! At this point, you already have a server that can access the Internet normally and scientifically, and also have a disguised website that can prevent active detection attacks. Next, just install the appropriate software on your client and you can enjoy a smooth network!
⬛⬛⬛⬛⬛⬛⬛⬜ 87.5%
7.11 Important errata
- The folder location of the
Xrayconfiguration fileconfig.jsonin the first version is wrong. If you have already operated according to the previous location,Xraywill not start correctly. Therefore, the errata is explained here, please check it yourself, and I am very sorry for the inconvenience!
- Correct location:
/usr/local/etc/xray/config.json - Wrong location:
/usr/local/etc/config.json
Affected sections:
- 7.4 Configure
Xray- 3. Usenanoto createXrayconfiguration file - 7.8 Server Optimization 2 - 6. Modify
Xrayfallback settings
- In the first version, the content of the
Nginxconfiguration filenginx.confwas modified incorrectly (the webpage folder location was incorrect). If you have already performed the operation according to the previous location,Nginxwill not be able to find the correct website. Please check it yourself. Sorry for the inconvenience!
- Correct folder location:
root /home/vpsadmin/www/webpage; - Wrong folder location:
root /var/www/website/html
Affected sections:
- 7.8 Server Optimization 2 - 4. Add a local port listener at the same level as the
80port to provide web page display
